How to Build a Custom MCP Server in Python & TypeScript (Step-by-Step 2026)

The Model Context Protocol (MCP) has revolutionized how autonomous artificial intelligence systems interact with enterprise software, internal APIs, and operational data stores. Rather than relying on rigid, hardcoded tool integrations or brittle webhooks, MCP establishes a universal, open standard that decouples foundation models from the systems they manipulate. Whether you are orchestrating agents in Claude Desktop, Cursor, or autonomous systems like OpenClaw, understanding how to build custom mcp server implementations is one of the most valuable engineering competencies in 2026.
In this comprehensive, production-oriented manual, you will learn how to architect, develop, debug, and securely deploy custom MCP servers using both modern Python (via FastMCP) and TypeScript (via the official MCP SDK). We walk through core protocol concepts, primitive implementations (Tools, Resources, and Prompts), local verification using the official MCP Inspector, and robust production hardening under Linux systemd and containerized environments.
Core Architecture: How the Model Context Protocol Works
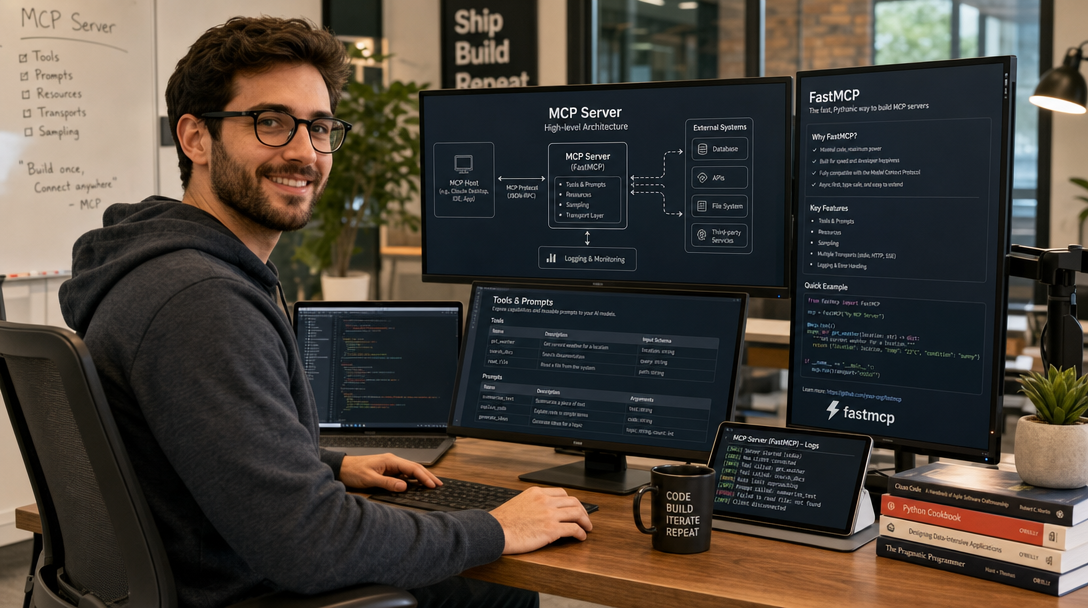
At its foundation, the Model Context Protocol operates as a standardized client-host-server architecture designed specifically for AI reasoning loops. In this topology:
- The Client (Host Application): An AI environment—such as Claude Desktop, an IDE extension like Cursor, or an autonomous orchestration pipeline—that initiates user sessions and manages language model context windows.
- The Protocol Layer: A bidirectional JSON-RPC 2.0 messaging protocol that facilitates discovery, capability negotiation, and stateful or stateless communication.
- The MCP Server: A dedicated process or network service that exposes domain-specific tools, contextual resources, and structured prompt templates to the client.
Transport Mechanisms: Standard I/O vs. Server-Sent Events
MCP supports two standard transport layers that dictate how messages are routed between the client host and the server process:
- Standard I/O (stdio): The host application launches the MCP server as a child process and communicates directly over
1stdin
and
1stdout. Standard error (
1stderr) is reserved for server logging and diagnostics, preventing protocol stream corruption. This transport provides ultra-low latency, zero network overhead, and automatic process lifecycle binding, making it the de facto choice for local developer environments and CLI utilities.
- Server-Sent Events (SSE) / HTTP: The server runs as an independent network daemon. The client opens an HTTP connection to receive continuous server-to-client updates via Server-Sent Events and dispatches client-to-server commands via HTTP POST requests. SSE is essential for remote deployments, shared team infrastructure, multi-tenant agent platforms, and containerized microservices.
Foundational MCP Primitives
Every MCP server can implement one or more of three foundational primitives:
- Tools: Executable functions that allow AI models to perform external computations, manipulate system state, or query live APIs (for example, executing SQL queries, querying cloud infrastructure, or triggering external notifications). Tools accept JSON-schema arguments and return structured text, binary blobs, or error payloads.
- Resources: Read-only, context-providing data objects identified by unique URI schemes (such as
1system://metrics
or
1postgres://schema). Unlike tools, resources do not cause external side effects; they provide passive background context directly into the model context window.
- Prompts: Reusable, parameterized prompt templates that guide user interactions or agent workflows. Prompts help organizations standardize operational procedures (such as incident triage workflows or code review checklists) right within the client UI.
Python (FastMCP) vs. TypeScript SDK Comparison
Choosing the right programming language depends on your existing infrastructure, team skillset, and runtime environment. The following comparison highlights key differences:
| Dimension | Python (FastMCP) | TypeScript (Official SDK) |
|---|---|---|
| Developer Experience | FastAPI-like decorator syntax; automatic schema generation from docstrings and Pydantic types. | Explicit handler registration; strict compile-time type safety with Zod schemas. |
| Primary Ecosystem | Data science, machine learning models, DevOps automation scripts, PyPI packages. | Web applications, Node.js backend services, full-stack microservices, npm ecosystem. |
| Transports | Built-in stdio and SSE (via Starlette / Uvicorn under the hood). | Native stdio transport and Express / HTTP transport adapters. |
| Performance & Concurrency | Native Python asyncio event loop. | Node.js asynchronous event loop; high-speed JSON stream parsing. |
| Packaging | Direct execution via uvx or standard virtual environments (venv). | Execution via npx or bundled standalone binaries (pkg / esbuild). |
Part 1: Building a Custom MCP Server in Python with FastMCP
The modern Python approach utilizes FastMCP, a high-level framework included in the official
1 | mcp |
Python package. FastMCP eliminates boilerplate code by inspecting function signatures, type annotations, and docstrings to automatically generate standard JSON Schema definitions for tools and resources.
Step 1: Setting Up the Python Environment
We recommend using
1 | uv |
for fast, reproducible dependency resolution. Open your terminal and set up an isolated project directory:
2
3
4
5
6
7
8
9
10
mkdir mcp-system-monitor
cd mcp-system-monitor
# Create virtual environment with Python 3.10+
uv venv
source .venv/bin/activate
# Install FastMCP and required diagnostic libraries
uv add "mcp[cli]" pydantic psutil
Step 2: Writing the Python Server Implementation
Create a file named
1 | server.py |
. In this example, we build a production system monitoring server that provides real-time hardware telemetry, directory log inspection, and an automated incident triage prompt template:
2
3
4
5
6
7
8
9
10
import psutil
import platform
import os
from typing import Dict, Any
# Initialize FastMCP server with name and optional dependencies
mcp = FastMCP(
name="System-Monitor-Pro",
description="Production-grade
2
3
4
5
6
7
8
9
10
11
12
13
14
15
16
17
18
19
20
21
22
23
24
25
26
27
28
29
30
31
32
33
34
35
36
37
38
39
40
)
@mcp.tool()
def get_system_telemetry() -> Dict[str, Any]:
"""Retrieve real-time host metrics including CPU, memory, swap, and disk utilization."""
vmem = psutil.virtual_memory()
swap = psutil.swap_memory()
disk = psutil.disk_usage('/')
return {
"hostname": platform.node(),
"platform": platform.platform(),
"cpu_count_logical": psutil.cpu_count(logical=True),
"cpu_count_physical": psutil.cpu_count(logical=False),
"cpu_percent": psutil.cpu_percent(interval=0.5),
"memory": {
"total_gb": round(vmem.total / (1024 ** 3), 2),
"available_gb": round(vmem.available / (1024 ** 3), 2),
"used_gb": round(vmem.used / (1024 ** 3), 2),
"percent": vmem.percent
},
"swap": {
"total_gb": round(swap.total / (1024 ** 3), 2),
"used_gb": round(swap.used / (1024 ** 3), 2),
"percent": swap.percent
},
"disk_root": {
"total_gb": round(disk.total / (1024 ** 3), 2),
"free_gb": round(disk.free / (1024 ** 3), 2),
"percent": disk.percent
}
}
@mcp.tool()
def inspect_recent_logs(log_filename: str, max_lines: int = 50) -> str:
"""Safely read the trailing lines of an authorized log file in /var/log.
Args:
log_filename: Filename within /var/log (e.g.,
2
3
4
5
6
7
8
9
10
11
12
13
14
15
16
17
18
19
20
21
22
23
24
25
26
27
28
29
30
31
32
33
34
35
36
37
38
max_lines: Number of trailing lines to inspect (maximum 200 lines)
"""
allowed_dir = "/var/log"
# Canonicalize path to prevent directory traversal vulnerabilities
target_path = os.path.realpath(os.path.join(allowed_dir, log_filename))
if not target_path.startswith(allowed_dir):
raise PermissionError("Access denied: Attempted directory traversal outside /var/log.")
if not os.path.exists(target_path):
return f"Log file '{log_filename}' does not exist in {allowed_dir}."
bounded_lines = min(max(1, max_lines), 200)
try:
with open(target_path, "r", encoding="utf-8", errors="replace") as f:
lines = f.readlines()
return "".join(lines[-bounded_lines:])
except Exception as e:
return f"Failed to read log file: {str(e)}"
@mcp.resource("system://static-spec")
def get_hardware_spec() -> str:
"""Provide static hardware and operating system specification context."""
return (
f"Operating System: {platform.system()} {platform.release()}\n"
f"Architecture: {platform.machine()}\n"
f"Python Runtime: {platform.python_version()}\n"
f"System Boot Time: {psutil.boot_time()}"
)
@mcp.prompt()
def incident_triage_prompt(incident_description: str) -> str:
"""Produce an autonomous incident triage protocol prompt for the AI agent."""
return (
f"Incident Alert Context: {incident_description}\n\n"
"Operational Instructions:\n"
"1.
2
3
4
5
6
7
8
"2. If CPU or memory is saturated, inspect the trailing lines of syslog using inspect_recent_logs.\n"
"3. Provide a root-cause diagnosis and a prioritized 3-step mitigation checklist for the on-call engineer."
)
if __name__ == "__main__":
# Launch server over standard input/output streams
mcp.run(transport="stdio")
Step 3: Local Verification with the MCP Development CLI
FastMCP includes a developer utility that spins up an interactive testing environment. Run the following command in your terminal:
This command starts the local process and opens the official web-based MCP Inspector. Within the UI, you can view your registered tools, verify input schema definitions, execute functions with test arguments, and inspect JSON-RPC message payloads in real time.
Part 2: Building a Custom MCP Server in TypeScript
For organizations standardizing on Node.js and TypeScript, the official
1 | @modelcontextprotocol/sdk |
package offers granular control over message dispatching, Zod schema validation, and lifecycle hooks.
Step 1: Project Initialization and Configuration
Create a dedicated TypeScript project and configure strict type checking:
2
3
4
5
6
7
8
9
10
11
12
13
mkdir mcp-ts-network
cd mcp-ts-network
# Initialize Node.js package
npm init -y
# Install core MCP SDK and Zod schema validator
npm install @modelcontextprotocol/sdk zod
npm install --save-dev typescript @types/node
# Generate tsconfig.json
npx tsc --init
Update your
1 | tsconfig.json |
to ensure proper ESM resolution:
2
3
4
5
6
7
8
9
10
11
12
13
14
"compilerOptions": {
"target": "ES2022",
"module": "NodeNext",
"moduleResolution": "NodeNext",
"outDir": "./dist",
"rootDir": "./src",
"strict": true,
"esModuleInterop": true,
"skipLibCheck": true,
"forceConsistentCasingInFileNames": true
},
"include": ["src/**/*"]
}
Update
1 | package.json |
to declare module type and build scripts:
2
3
4
5
6
7
8
"type": "module",
"scripts": {
"build": "tsc",
"start": "node dist/index.js",
"dev": "tsc && node dist/index.js"
}
}
Step 2: Implementing the Server Logic
Create
1 | src/index.ts |
. In this example, we implement a network utility server that provides structured DNS resolution and port probing capabilities:
2
3
4
5
6
7
8
9
10
11
12
13
14
15
16
17
18
19
20
21
22
23
24
25
26
27
28
29
30
31
32
33
34
35
36
37
38
39
40
41
42
43
44
45
46
47
48
49
50
51
52
53
54
55
56
57
58
59
60
61
62
63
64
65
66
67
68
69
70
71
72
73
74
75
76
77
78
79
80
81
82
83
84
85
86
87
88
89
90
91
92
93
94
95
96
97
98
99
100
101
102
103
104
105
106
107
108
109
110
111
112
113
114
115
116
117
118
119
120
121
import { StdioServerTransport } from "@modelcontextprotocol/sdk/server/stdio.js";
import {
CallToolRequestSchema,
ListToolsRequestSchema,
ListResourcesRequestSchema,
ReadResourceRequestSchema
} from "@modelcontextprotocol/sdk/types.js";
import { z } from "zod";
import dns from "node:dns/promises";
// Initialize server instance
const server = new Server(
{
name: "Network-Diagnostic-Server",
version: "1.0.0"
},
{
capabilities: {
tools: {},
resources: {}
}
}
);
// Define input validation schemas with Zod
const ResolveDnsArgsSchema = z.object({
hostname: z.string().min(1).describe("Target domain name (e.g., example.com)"),
recordType: z.enum(["A", "AAAA", "MX", "TXT"]).default("A").describe("DNS record type to query")
});
// 1. Tool Discovery Handler
server.setRequestHandler(ListToolsRequestSchema, async () => {
return {
tools: [
{
name: "resolve_dns",
description: "Perform asynchronous DNS lookup for a specific domain and record type.",
inputSchema: {
type: "object",
properties: {
hostname: {
type: "string",
description: "Target domain name (e.g., example.com)"
},
recordType: {
type: "string",
enum: ["A", "AAAA", "MX", "TXT"],
default: "A",
description: "DNS record type"
}
},
required: ["hostname"]
}
}
]
};
});
// 2. Tool Execution Handler
server.setRequestHandler(CallToolRequestSchema, async (request) => {
const { name, arguments: rawArgs } = request.params;
if (name === "resolve_dns") {
const parseResult = ResolveDnsArgsSchema.safeParse(rawArgs);
if (!parseResult.success) {
return {
isError: true,
content: [
{
type: "text",
text: `Validation failed: ${parseResult.error.issues.map((i) => i.message).join(", ")}`
}
]
};
}
const { hostname, recordType } = parseResult.data;
try {
let records: any;
if (recordType === "A") records = await dns.resolve4(hostname);
else if (recordType === "AAAA") records = await dns.resolve6(hostname);
else if (recordType === "MX") records = await dns.resolveMx(hostname);
else if (recordType === "TXT") records = await dns.resolveTxt(hostname);
return {
content: [
{
type: "text",
text: JSON.stringify({ hostname, recordType, records }, null, 2)
}
]
};
} catch (error: any) {
return {
isError: true,
content: [
{
type: "text",
text: `DNS resolution failed for ${hostname}: ${error.message}`
}
]
};
}
}
throw new Error(`Tool "${name}" not recognized by server.`);
});
// 3. Connect Transport
async function run() {
const transport = new StdioServerTransport();
await server.connect(transport);
console.error("Network-Diagnostic-Server active and listening on stdio.");
}
run().catch((error) => {
console.error("Fatal startup error:", error);
process.exit(1);
});
Step 3: Compilation and Execution
Compile the TypeScript code and verify execution:
2
npm start
Integrating Custom MCP Servers with Client Applications
Once your server is built and verified, you can integrate it into client environments such as Claude Desktop or autonomous agents.
Claude Desktop Configuration
To integrate both your Python and TypeScript servers into Claude Desktop, edit your local configuration file (located at
1 | ~/Library/Application Support/Claude/claude_desktop_config.json |
on macOS or
1 | %APPDATA%\Claude\claude_desktop_config.json |
on Windows):
2
3
4
5
6
7
8
9
10
11
12
"mcpServers": {
"system-monitor": {
"command": "/home/user/mcp-system-monitor/.venv/bin/python",
"args": ["/home/user/mcp-system-monitor/server.py"]
},
"network-diagnostics": {
"command": "node",
"args": ["/home/user/mcp-ts-network/dist/index.js"]
}
}
}
After saving the configuration, completely restart Claude Desktop. The application will detect the two servers during initialization, negotiate tools and capabilities, and display the tool selector icon in your chat window.
Production Hardening and Security Guidelines in 2026
Deploying custom MCP servers in production—especially when exposed to remote agents or running as daemon services—demands rigorous defensive engineering. Because models construct tool arguments dynamically, an unhardened MCP server can quickly become a vector for remote code execution or data leakage.
1. Deploying as a Hardened systemd Daemon
When running an MCP server over HTTP/SSE on a Linux host, supervise the process with
1 | systemd |
using modern Linux security sandboxing features (save as
1 | /etc/systemd/system/mcp-monitor.service |
):
2
3
4
5
6
7
8
9
10
11
12
13
14
15
16
17
18
19
20
21
22
23
24
25
Description=Production FastMCP System Monitor Daemon
After=network.target
[Service]
Type=simple
User=mcp-daemon
Group=mcp-daemon
WorkingDirectory=/opt/mcp-system-monitor
ExecStart=/opt/mcp-system-monitor/.venv/bin/python server.py --transport sse --port 8080
Restart=always
RestartSec=5s
Environment="PYTHONUNBUFFERED=1"
# Advanced Linux Namespace and Security Hardening
ProtectSystem=strict
ProtectHome=read-only
PrivateTmp=true
NoNewPrivileges=true
ProtectKernelTunables=true
ProtectControlGroups=true
RestrictRealtime=true
[Install]
WantedBy=multi-user.target
Reload systemd and start the background service:
2
3
sudo systemctl enable --now mcp-monitor.service
sudo systemctl status mcp-monitor.service
2. Security Best Practices Checklist
| Security Domain | Vulnerability / Risk | Mitigation Strategy |
|---|---|---|
| Path Traversal | AI agent inputs like ../../etc/shadow in file tools. | Always resolve paths with os.path.realpath() and enforce an approved directory prefix. |
| Privilege Escalation | Server running as root executing arbitrary subcommands. | Run under a dedicated unprivileged user (mcp-daemon) with no sudo privileges. |
| Command Injection | Passing unescaped LLM arguments directly into subprocess(shell=True). | Never invoke a shell; use parameterized arrays with strict input validation. |
| Denial of Service | Infinite loops or massive payload queries exhausting host memory. | Enforce strict argument bounds (e.g., max 200 lines) and aggressive process timeouts. |
| Secret Exposure | Accidental leakage of API keys or database credentials in error messages. | Sanitize error responses; return generic failure notes to the client and log details to stderr. |
Summary and What to Build Next
Building custom Model Context Protocol servers enables your AI agents to move beyond generic conversation and become proactive, highly specialized assistants deeply connected to your operational environment. With FastMCP in Python, you can prototype and deploy telemetry and data-science tools in minutes. With the TypeScript SDK, you can integrate seamlessly into existing enterprise Node.js architectures.
As you expand your MCP infrastructure, consider exploring advanced protocol capabilities such as bidirectional sampling (allowing servers to request completions back from the host), dynamic resource subscription feeds, and multi-tenant authentication gateways.
- About the Author
- Latest Posts

Mark is a senior content editor at Text-Center.com and has more than 20 years of experience with linux and windows operating systems. He also writes for Biteno.com